
This help section contains advice on editing website content, for example in Forum Topics (all members), or in Meet and Tour descriptions (meet and tour leaders only) or in Pages and News Items (editors only).
Each content type has different fields which may either contain plain text or HTML (allowing a full range of rich content). Fields which allow HTML have an editor toolbar at the top of the field:

The buttons in the editor toolbar allow formatting to be applied to the text in a similar way to a word processor like Microsoft Word. For those people with the relevant skills, the “Source” button toggles the display, and allows HTML to be edited directly.
The meaning of the buttons in this toolbar are shown below. Most of these are fairly obvious and operate in a similar way to a word processor, but further explanation is given below for those buttons marked *:
| Button | Title |
 |
Cut, Copy, Paste |
 |
Format - Allows the HTML format to be specified (experienced users only). |
 |
Bold, Italic, Underline |
 |
Numbered List, Bullet List |
 |
*Insert Image |
 |
*Insert Table |
 |
*Link, Unlink |
 |
Anchor (experienced users only) |
 |
Source - Toggles the editor to allow HTML to be entered directly (experienced users only). |
Adding Tables
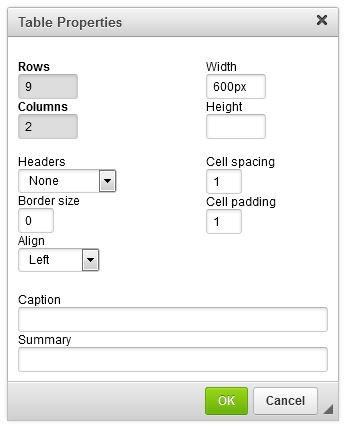
The Insert Table button is used to add a table. The website standard is to set the “Border size” to 0 as shown below:
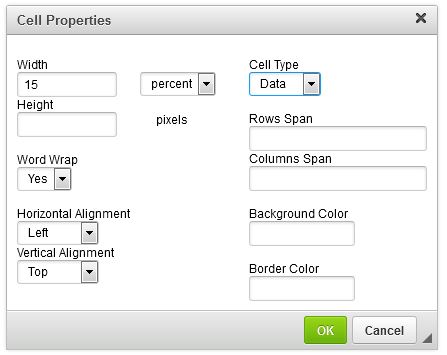
Once the table has been added, further properties can be set, for example by right-clicking on a table cell and selecting Cell / Cell properties. This allows the horizontal and vertical alignment of the cell to be set, and also the width of a column to be set (by setting the width as a percentage of the total table, or in pixels).
Adding Hyperlinks
To add a hyperlink, first type the text you want to see on the page, highlight it, and then select the "Link" button which allows a hyperlink to be added to the selected text.
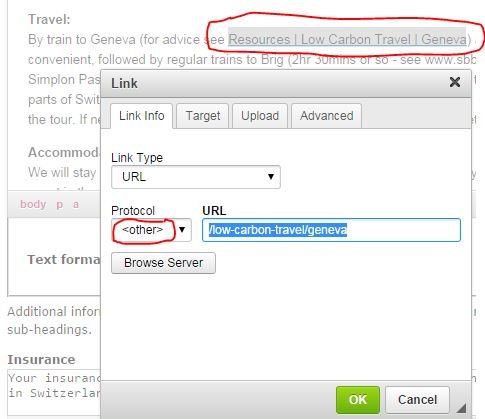
Links to external websites should have the protocol set to “http://” and be of the form “www.example.com/home”.
Links to other documents or pages within the website (relative links) should have the protocol set to “<other>” and start with a "/" - they shouldn't include "www.eagleskiclub.org.uk" It is easy to see the required URL by checking the browser address when on the relevant page, but examples include:
- /low-carbon-travel - for the introductory page on Low Carbon Travel.
- /tours/tour-grading - for the page describing tour grades.
- /uk-meet/mar-lodge-braemar - for the description of this Scottish Meet.
- /club-tours/2015/haute-route-ossola - for the description of this Club Tour in the 2015 programme.
- /system/files/Tour%20Application%20Form.doc - for the Tour Application form (in Word format).
- /system/files/xxx.doc - for the xxx.doc Word Document added as a page attachment.
Adding Images
NOTE THAT IMAGES CAN ONLY BE ADDED TO FIELDS WHICH ALLOW RICH CONTENT I.E. WHICH HAVE A WORD PROCESSOR STYLE TOOLBAR AT THE TOP. (For Tour Descriptions these are the "Programme" and "Details" fields).
Before adding an image into the page, the image file should first be uploaded in the "Images" section. Use the "Choose file" button to select a file from your computer and then select "Upload". Note that if the image is higher resolution than 2000 x 2000 it will be automatically scaled down before saving.

A page can have as many images as you want. Once you have uploaded an image, add a "Title" field - this will act as a tooltip for the image when it is displayed in the page.
Once the images are uploaded, you need to insert them onto your page. Place the cursor in the place where you want the image displayed, select the style (either Small, Medium or Large) and then click "Insert".
This will place a scaled version of the image on the page (either 160, 320 or 600 pixels wide depending on whether it is Small, Medium or Large) which when clicked will launch an overlay showing the image at full resolution. All images are "responsive", so will scale to fit the device on which they are displayed (phone / tablet / PC etc).

Once an image has been inserted into a page, if needed, you can make adjustments by editing the properties - right click on the image and select "Image Properties":

The "Image Properties" dialog allows you to control the fine details of how the image is displayed. Use the "Align" field to position the image on the left or the right and to allow text to flow round it.
Attaching Files
It is possible to attach image files and documents to the page, which can then be referenced from within the page. This feature can be used to include photos on the page; to include a trip report in Word or PDF format; or to include a custom application form for a tour.
To add the document to the website, use the “File Attachments” section – just above the Save button, select the required file using "Choose File" and then "Upload" it. This will then display the file in the list of attached files:
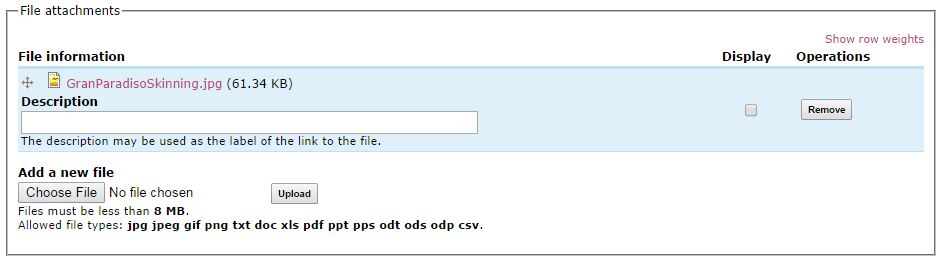
If the "Display" option is ticked, the file appears in a list of attached files at the bottom of the page. A better method is to untick "Display" and include a reference to the file within the main page - either as an image display (see above), or as a hyperlink to the document. Images and documents saved using this method can be referenced from elsewhere on the page using a URL of the form “/system/files/xxx.doc” or “/system/files/xxx.jpg”.